
領先一步
VMware 提供培訓和認證,助您加速進步。
瞭解更多如今,應用程式被構建為一系列小的獨立上游服務。這加快了開發速度,並使模組能夠專注於特定的職責,從而提高它們的質量。這是使用微服務方法的主要優勢之一。然而,從一個服務跳到另一個服務會增加額外的延遲,當服務沒有響應時,這種延遲會急劇增加。
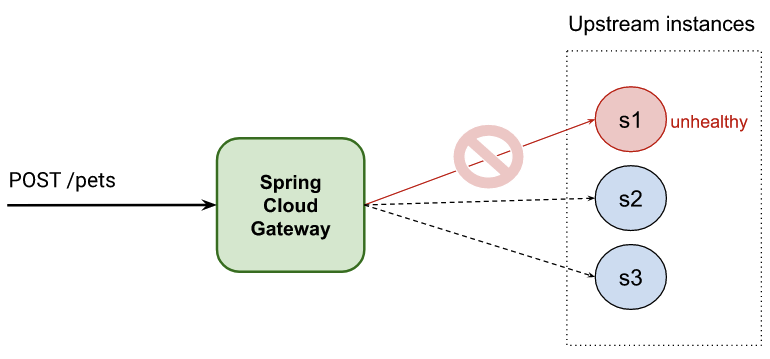
如果您執行微服務,您希望防止上游服務在未正常工作時被呼叫。即使使用熔斷器模式,也可能導致響應時間延遲。因此,有時最好主動檢查上游服務,以驗證它們在需要之前是否已準備就緒。
健康檢查是一種根據服務狀態確定其是否能正確響應的方法,可防止超時和錯誤。
被動健康檢查是在請求處理期間進行的。如果服務最終不健康,應用程式將返回失敗並標記該端點不健康。這可能會增加額外的延遲。
主動健康檢查會在接收請求之前在後臺檢查並剔除不健康的服務。它不會增加額外的延遲。
最後但同樣重要的是,這些功能可以與熔斷器庫結合使用,立即回退到備用端點,而不會遭受首次失敗的懲罰。
目標是讓路由透過負載均衡策略將請求轉發到健康的上游服務。
本文分為兩部分
Spring 中有一些功能可以幫助您實現主動健康檢查。
Spring Cloud Gateway Spring Cloud Gateway 提供了一個基於 Spring 和 Java 構建 API 閘道器的庫。它透過 LoadBalancerClientFilter/ReactiveLoadBalancerClientFilter 全域性過濾器支援上述功能。在本文中,您可以看到使用這些全域性過濾器之一的不同方法。
不過,首先,讓我們探討一些這些功能。
Spring Cloud 中包含一個用於負載均衡的全域性過濾器,可以透過使用特殊的 URI 表示法啟用:lb://your-service-name。
spring:
 cloud:
   gateway:
     routes:
       - id: myRoute
         uri: lb://your-service-name
         predicates:
         - Path=/service/**
負載均衡器過濾器 ReactiveLoadBalancerClientFilter(適用於響應式應用程式)將檢測 URI 並將其替換為與“your-service-name”關聯的可用端點。
請注意,您需要將“your-service-name”註冊到服務發現註冊中心。我們將在以下部分中看到不同的註冊方法。
預設情況下,流量會路由到上游服務,即使它們不健康。為了防止選中一個不好的服務,您可以啟用 Spring Cloud 的負載均衡器客戶端提供的 health-check 配置。
    spring:
      cloud:
        loadbalancer:
          configurations: health-check
所有端點將透過自動使用 Spring Boot Actuator 健康端點定期檢查。您還可以自定義一些選項,例如 spring.cloud.loadbalancer.health-check.<your-service-name>.path 和 spring.cloud.loadbalancer.health-check.interval。
預設的健康檢查配置使用
/actuator/health端點檢查上游服務端點,這要求在您的上游服務中啟用 Spring Actuator。
有關更多選項,請參閱 LoadBalancerClientsProperties 和 LoadBalancerProperties 類。
Spring Cloud Gateway 有一個內建功能,它將部署所有可用作路由的服務。本文描述的是相反的情況,即我們聲明瞭負載均衡的路由,包括主動健康檢查。
在上一節中,您指定了一個負載均衡的 URI (lb://your-service-name),但現在您需要註冊與 URI 的服務名稱關聯的端點。我們將在以下部分中探討一些方法。
您可以透過配置 spring.cloud.discovery.client.simple.instances 屬性來靜態啟用客戶端負載均衡。它是一個對映,其鍵是服務名稱(由 lb:// URI 使用),值是一個 org.springframework.cloud.client.ServiceInstance 物件陣列,指向各個上游服務。
靜態負載均衡的一些優點包括:
問題是您在配置中靜態設定了上游服務。如果需要更改列表,則需要重新啟動應用程式。
示例
spring:
  cloud:
    gateway:
      routes:
        - uri: lb://hello-service # Load Balancer URI handled by ReactiveLoadBalancerClientFilter
          predicates:
            - Path=/hello
    loadbalancer:
      configurations: health-check # Required for enabling SDC with health checks
    discovery:
      client:
        simple: # SimpleDiscoveryClient to configure statically services
          instances:
            hello-service:
              - secure: false
                port: 8090
                host: localhost
                serviceId: hello-service
                instanceId: hello-service-1
              - secure: false
                port: 8091
                host: localhost
                serviceId: hello-service
                instanceId: hello-service-2
# Run server 1
SERVER_PORT=8090 ./gradlew :service:bootRun
# Run server 2
SERVER_PORT=8091 ./gradlew :service:bootRun
curl https://:8090/actuator/health
{"status":"UP"}
curl localhost:8090/hello
{ "message": "hello world!"}%
./gradlew :1-service-disc-by-properties:bootRun
curl localhost:8881/hello
{ "message": "hello world from port 8090!"}%
curl localhost:8881/hello
{ "message": "hello world from port 8091!"}%
您可能需要多次執行前面的命令才能從不同的伺服器獲取響應。
curl localhost:8090/status/false -X PUT
curl https://:8090/actuator/health
{"status":"DOWN"}
您可能會收到埠 8090 上的一個響應,因為在您傳送請求時健康檢查尚未檢查該端點。間隔可以透過屬性 spring.cloud.loadbalancer.health-check.interval 進行修改。
此外,您可能會看到一些訊息,描述其中一個上游端點不健康,因此不可用。
2023-05-08 14:59:53.151 DEBUG 9906 --- [ctor-http-nio-3] r.n.http.client.HttpClientOperations     : [12d42e83-77, L:/127.0.0.1:57439 - R:localhost/127.0.0.1:8090] Received response (auto-read:false) : RESPONSE(decodeResult: success, version: HTTP/1.1)
HTTP/1.1 503 Service Unavailable
curl localhost:8881/hello
{ "message": "hello world from port 8091!"}%
curl localhost:8091/status/false -X PUT
curl localhost:8881/hello
{"timestamp":"2023-05-08T13:07:48.704+00:00","path":"/hello","status":503,"error":"Service Unavailable","requestId":"6b5d6010-199"}%
靜態配置的靈活性不高,但使用 Eureka 作為服務發現可以消除這一缺點。
代價是您的架構需要一個新的元件,這可能會增加您的維護負擔。這對於某些客戶來說可能不是一個選擇。
以下示例配置了 Eureka 整合。
    spring:
      application:
        name: scg-client-with-eureka
      cloud:
        loadbalancer:
          configurations: health-check # Note: required for enabling SDC with health checks - remove this line if you want to reproduce issues because not using health checks in LB
          # Note: LoadBalancerCacheProperties.ttl (or spring.cloud.loadbalancer.cache.ttl) is 35 by default - You will need to wait 35secs after an instance turns healthy
        gateway:
          httpclient:
            wiretap: true
          routes:
            - uri: lb://hello-service
              predicates:
                - Path=/headers
              filters:
                - StripPrefix=0

    eureka:
      client:
        webclient:
          enabled: true
        serviceUrl:
          defaultZone: https://:8761/eureka
        fetchRegistry: true
        registerWithEureka: false
      instance:
        preferIpAddress: true
./gradlew :eureka-server:bootRun
等待直到您看到 Eureka 伺服器已啟動。
2023-06-26 12:51:46.901 INFO 88601 --- [ Thread-9] e.s.EurekaServerInitializerConfiguration : Started Eureka Server
eureka 配置檔案的伺服器# Run server 1
SPRING_PROFILES_ACTIVE=eureka SERVER_PORT=8090 ./gradlew :service:bootRun
# Run server 2
SPRING_PROFILES_ACTIVE=eureka SERVER_PORT=8091 ./gradlew :service:bootRun
您應該在伺服器的日誌中看到服務例項已新增到 Eureka 中(步驟 1)。
2023-06-26 12:52:50.805  INFO 88601 --- [nio-8761-exec-3] c.n.e.registry.AbstractInstanceRegistry  : Registered instance HELLO-SERVICE/192.168.0.14:hello-service:8090 with status UP (replication=true)
2023-06-26 12:53:29.127  INFO 88601 --- [nio-8761-exec-9] c.n.e.registry.AbstractInstanceRegistry  : Registered instance HELLO-SERVICE/192.168.0.14:hello-service:8091 with status UP (replication=true)
訪問 https://:8761/ 並檢查伺服器是否包含為應用程式 hello-service 的例項。
執行 Spring Cloud Gateway
SERVER_PORT=8883 ./gradlew :3-eureka-service-disc:bootRun
5.測試 Spring Cloud Gateway 負載均衡器
curl localhost:8883/hello
{ "message": "hello world from port 8090!"}%
curl localhost:8883/hello
{ "message": "hello world from port 8091!"}%
curl localhost:8090/status/false -X PUT
您應該在 Eureka 儀表板中看到只有一個例項可用,並且會看到一些日誌訊息抱怨埠 8090 上的服務不可用。健康檢查不是即時的,因此您可能需要等待幾秒鐘才能看到例項被標記為 DOWN。
如您所見,Spring Cloud Gateway 提供了一個建立自定義過濾器的選項。它還允許您應用過濾器和更改路由而無需重新啟動閘道器。
在本節中,您可以看到一個自定義過濾器實現,它透過使用 Spring Cloud Gateway 路由配置來設定服務的負載均衡和健康檢查。
如果您的專案中已經有一個服務發現伺服器,這可能不是您的最佳選擇。如果沒有,這是一種簡單且經濟實惠的方式,可以將兩個強大功能整合到您的專案中。
    spring:
      application:
        name: custom-service-disc
      cloud:
        loadbalancer:
          configurations: health-check # Note: required for enabling SDC with health checks - remove this line if you want to reproduce issues because not using health checks in LB
          # Note: LoadBalancerCacheProperties.ttl (or spring.cloud.loadbalancer.cache.ttl) is 35 by default - You will need to wait 35secs after an instance turns healthy
        gateway:
          routes:
            - uri: lb://hello-service
              id: load-balanced
              predicates:
                - Path=/load-balanced/**
              filters:
                - StripPrefix=1
                - LoadBalancer=localhost:8090;localhost:8091;localhost:8092
新的 LoadBalancer 路由過濾器允許您配置與 lb://hello-service 負載均衡器 URI 關聯的上游服務端點。
@Component
public class LoadBalancerGatewayFilterFactory extends AbstractGatewayFilterFactory<LoadBalancerGatewayFilterFactory.MyConfiguration> {

	// ...

	@Override
	public GatewayFilter apply(MyConfiguration config) {
		return (exchange, chain) -> {
			final Route route = exchange.getAttribute(GATEWAY_ROUTE_ATTR);
			if (StringUtils.hasText(config.getInstances()) && route.getUri().getScheme().equals("lb")) {
				config.getServiceInstances(route.getUri().getHost()).forEach(discoveryClient::addInstance);
			}

			return chain.filter(exchange);
		};
	}
如果路由與 lb://<service-host> 模式匹配,LoadBalancerGatewayFilterFactory 會將來自過濾器配置的所有上游服務端點與 service-host 相關聯。
在底層,一個新的 ReactiveCustomDiscoveryClient 發現客戶端實現已包含在我們的程式碼中,用於管理上游服務端點。Spring 會檢測到這樣的 bean 並將其在用於確定可用端點的 DiscoveryClient 列表中優先。
# Run server 1
SERVER_PORT=8090 ./gradlew :service:bootRun
# Run server 2
SERVER_PORT=8091 ./gradlew :service:bootRun
curl https://:8090/actuator/health
{"status":"UP"}
curl localhost:8090/hello
{ "message": "hello world!"}%
SERVER_PORT=8882 ./gradlew :2-custom-service-disc:bootRun
curl localhost:8882/hello
{ "message": "hello world from port 8090!"}%
curl localhost:8882/hello
{ "message": "hello world from port 8091!"}%
您可能需要多次執行前面的命令才能從不同的伺服器獲取響應。
curl localhost:8090/status/false -X PUT
curl https://:8090/actuator/health
{"status":"DOWN"}
您可能會收到埠 8090 上的一個響應,因為在您傳送請求時健康檢查尚未檢查該端點。間隔可以透過 spring.cloud.loadbalancer.health-check.interval 屬性進行修改。
此外,您可能會看到一些訊息,描述其中一個上游端點不健康,因此不可用。
2023-05-08 15:59:53.151 DEBUG 9906 --- [ctor-http-nio-2] r.n.http.client.HttpClientOperations     : [12d42e83-77, L:/127.0.0.1:57439 - R:localhost/127.0.0.1:8090] Received response (auto-read:false) : RESPONSE(decodeResult: success, version: HTTP/1.1)
HTTP/1.1 503 Service Unavailable
curl localhost:8882/hello
{ "message": "hello world from port 8091!"}%
curl localhost:8091/status/false -X PUT
curl localhost:8882/hello
{"timestamp":"2023-05-08T14:07:48.704+00:00","path":"/hello","status":503,"error":"Service Unavailable","requestId":"6b5d6010-199"}%
在本文中,您看到了在專案中實現負載均衡和主動健康檢查的多種方法。
總而言之,您還看到了,如果您不需要向架構中新增額外的元件,Spring Cloud Gateway 方法是一個不錯的選擇。
想了解更多關於 Spring Cloud 的資訊嗎?歡迎線上加入我們,參加 Spring Academy!
想要透過在路由中新增一個屬性就能獲得主動健康檢查,而無需親自動手嗎?請檢視我們支援 Kubernetes 的商業平臺。