<!DOCTYPE html>
<html xmlns="http://www.w3.org/1999/xhtml" xmlns:th="https://www.thymeleaf.org">
    <head>
        <title>Spring Security Example</title>
    </head>
    <body>
        <h1>Welcome!</h1>

        <p>Click <a th:href="@{/hello}">here</a> to see a greeting.</p>
    </body>
</html>保護 Web 應用程式
本指南將引導您建立一個簡單的 Web 應用程式,其資源受 Spring Security 保護。
您將構建什麼
您將構建一個 Spring MVC 應用程式,該應用程式透過一個由固定使用者列表支援的登入表單來保護頁面。
你需要什麼
-
大約 15 分鐘
-
一個喜歡的文字編輯器或 IDE
-
Java 17 或更高版本
-
您還可以將程式碼直接匯入到您的 IDE 中
如何完成本指南
與大多數 Spring 入門指南一樣,您可以從頭開始並完成每個步驟,也可以跳過您已熟悉的基本設定步驟。無論哪種方式,您最終都會得到可工作的程式碼。
要從頭開始,請轉到從 Spring Initializr 開始。
要跳過基礎知識,請執行以下操作
-
下載並解壓本指南的源儲存庫,或使用 Git 克隆它:
git clone https://github.com/spring-guides/gs-securing-web.git -
進入
gs-securing-web/initial
完成後,您可以對照 gs-securing-web/complete 中的程式碼檢查結果。
從 Spring Initializr 開始
您可以使用此預初始化專案,然後單擊“生成”下載 ZIP 檔案。此專案已配置為符合本教程中的示例。
手動初始化專案
-
導航到 https://start.spring.io。此服務會為您拉取應用程式所需的所有依賴項,併為您完成大部分設定。
-
選擇 Gradle 或 Maven 以及您想要使用的語言。
-
單擊依賴項並選擇Spring Web和Thymeleaf。
-
單擊生成。
-
下載生成的 ZIP 檔案,這是一個已根據您的選擇配置好的 Web 應用程式存檔。
| 如果您的 IDE 集成了 Spring Initializr,您可以從 IDE 中完成此過程。 |
| 您還可以從 GitHub fork 專案,並在您的 IDE 或其他編輯器中開啟它。 |
建立非安全 Web 應用程式
在將安全性應用於 Web 應用程式之前,您需要一個 Web 應用程式來保護。本節將引導您建立一個簡單的 Web 應用程式。然後,您將在下一節中使用 Spring Security 保護它。
該 Web 應用程式包含兩個簡單的檢視:主頁和“Hello, World”頁面。主頁在以下 Thymeleaf 模板中定義(來自 src/main/resources/templates/home.html)
此簡單檢視包含指向 /hello 頁面的連結,該頁面在以下 Thymeleaf 模板中定義(來自 src/main/resources/templates/hello.html)
<!DOCTYPE html>
<html xmlns="http://www.w3.org/1999/xhtml" xmlns:th="https://www.thymeleaf.org">
    <head>
        <title>Hello World!</title>
    </head>
    <body>
        <h1>Hello world!</h1>
    </body>
</html>
Web 應用程式基於 Spring MVC。因此,您需要配置 Spring MVC 並設定檢視控制器以公開這些模板。以下列表顯示了一個在應用程式中配置 Spring MVC 的類
Java
package com.example.securingweb;

import org.springframework.context.annotation.Configuration;
import org.springframework.web.servlet.config.annotation.ViewControllerRegistry;
import org.springframework.web.servlet.config.annotation.WebMvcConfigurer;

@Configuration
public class MvcConfig implements WebMvcConfigurer {

	public void addViewControllers(ViewControllerRegistry registry) {
		registry.addViewController("/home").setViewName("home");
		registry.addViewController("/").setViewName("home");
		registry.addViewController("/hello").setViewName("hello");
		registry.addViewController("/login").setViewName("login");
	}

}
Kotlin
package com.example.securingweb

import org.springframework.context.annotation.Configuration
import org.springframework.web.servlet.config.annotation.ViewControllerRegistry
import org.springframework.web.servlet.config.annotation.WebMvcConfigurer

@Configuration
class MvcConfig : WebMvcConfigurer {
    override fun addViewControllers(registry: ViewControllerRegistry) {
        registry.addViewController("/home").setViewName("home")
        registry.addViewController("/").setViewName("home")
        registry.addViewController("/hello").setViewName("hello")
        registry.addViewController("/login").setViewName("login")
    }
}
addViewControllers() 方法(它覆蓋了 WebMvcConfigurer 中同名的方法)添加了四個檢視控制器。其中兩個檢視控制器引用名為 home 的檢視(在 home.html 中定義),另一個引用名為 hello 的檢視(在 hello.html 中定義)。第四個檢視控制器引用另一個名為 login 的檢視。您將在下一節中建立該檢視。
此時,您可以跳到“執行應用程式”並執行應用程式,而無需登入任何內容。
現在您有了一個非安全的 Web 應用程式,您可以為其新增安全性。
設定 Spring Security
假設您想阻止未經授權的使用者檢視 /hello 處的歡迎頁面。現在,如果訪問者單擊主頁上的連結,他們將看到歡迎頁面,沒有任何障礙阻止他們。您需要新增一個障礙,強制訪問者在檢視該頁面之前登入。
您可以透過在應用程式中配置 Spring Security 來實現此目的。如果 Spring Security 在類路徑中,Spring Boot 會自動使用“基本”身份驗證保護所有 HTTP 端點。但是,您可以進一步自定義安全設定。您需要做的第一件事是將 Spring Security 新增到類路徑。
使用 Gradle,您需要在 build.gradle(.kts) 檔案的 dependencies 部分中新增三行(一行用於應用程式,一行用於 Thymeleaf 和 Spring Security 整合,一行用於測試),如以下列表所示
Groovy (build.gradle)
implementation 'org.springframework.boot:spring-boot-starter-security'
implementation 'org.thymeleaf.extras:thymeleaf-extras-springsecurity6'
testImplementation 'org.springframework.security:spring-security-test'
Kotlin (build.gradle.kts)
implementation("org.springframework.boot:spring-boot-starter-security")
implementation("org.thymeleaf.extras:thymeleaf-extras-springsecurity6")
testImplementation("org.springframework.security:spring-security-test")
以下列表顯示了已完成的 build.gradle(.kts) 檔案
Groovy (build.gradle)
plugins {
	id 'java'
	id 'org.springframework.boot' version '3.5.7'
	id 'io.spring.dependency-management' version '1.1.7'
}

group = 'com.example'
version = '0.0.1-SNAPSHOT'
sourceCompatibility = '17'

repositories {
	mavenCentral()
}

dependencies {
	implementation 'org.springframework.boot:spring-boot-starter-web'
	implementation 'org.springframework.boot:spring-boot-starter-thymeleaf'
	implementation 'org.springframework.boot:spring-boot-starter-security'
	implementation 'org.thymeleaf.extras:thymeleaf-extras-springsecurity6'
	testImplementation 'org.springframework.security:spring-security-test'
	testImplementation 'org.springframework.boot:spring-boot-starter-test'
}

test {
	useJUnitPlatform()
}
Kotlin (build.gradle.kts)
plugins {
    kotlin("jvm") version "1.9.25"
    kotlin("plugin.spring") version "1.9.25"
    id("org.springframework.boot") version "3.5.7"
    id("io.spring.dependency-management") version "1.1.7"
}

group = "com.example"
version = "0.0.1-SNAPSHOT"
java.sourceCompatibility = JavaVersion.VERSION_17

repositories {
    mavenCentral()
}

dependencies {
    implementation("org.springframework.boot:spring-boot-starter-web")
    implementation("org.springframework.boot:spring-boot-starter-thymeleaf")
    implementation("org.jetbrains.kotlin:kotlin-reflect")
    implementation("org.springframework.boot:spring-boot-starter-security")
    implementation("org.thymeleaf.extras:thymeleaf-extras-springsecurity6")
    testImplementation("org.springframework.security:spring-security-test")
    testImplementation("org.springframework.boot:spring-boot-starter-test")
}

kotlin {
    jvmToolchain(17)
    compilerOptions {
        freeCompilerArgs.addAll("-Xjsr305=strict")
    }
}

tasks.withType<Test> {
    useJUnitPlatform()
}
使用 Maven,您需要在 pom.xml 的 <dependencies> 元素中新增兩個額外條目(一個用於應用程式,一個用於測試),如以下列表所示
<dependency>
	<groupId>org.springframework.boot</groupId>
	<artifactId>spring-boot-starter-security</artifactId>
</dependency>
<dependency>
	<groupId>org.thymeleaf.extras</groupId>
	<artifactId>thymeleaf-extras-springsecurity6</artifactId>
</dependency>
<dependency>
	<groupId>org.springframework.security</groupId>
	<artifactId>spring-security-test</artifactId>
	<scope>test</scope>
</dependency>
以下列表顯示了已完成的 pom.xml 檔案
<?xml version="1.0" encoding="UTF-8"?>
<project xmlns="http://maven.apache.org/POM/4.0.0" xmlns:xsi="http://www.w3.org/2001/XMLSchema-instance"
	xsi:schemaLocation="http://maven.apache.org/POM/4.0.0 https://maven.apache.org/xsd/maven-4.0.0.xsd">
	<modelVersion>4.0.0</modelVersion>
	<parent>
		<groupId>org.springframework.boot</groupId>
		<artifactId>spring-boot-starter-parent</artifactId>
		<version>3.5.7</version>
		<relativePath/> <!-- lookup parent from repository -->
	</parent>
	<groupId>com.example</groupId>
	<artifactId>securing-web-complete</artifactId>
	<version>0.0.1-SNAPSHOT</version>
	<name>securing-web-complete</name>
	<description>Demo project for Spring Boot</description>

	<properties>
		<java.version>17</java.version>
	</properties>

	<dependencies>
		<dependency>
			<groupId>org.springframework.boot</groupId>
			<artifactId>spring-boot-starter-thymeleaf</artifactId>
		</dependency>
		<dependency>
			<groupId>org.springframework.boot</groupId>
			<artifactId>spring-boot-starter-web</artifactId>
		</dependency>
		<dependency>
			<groupId>org.springframework.boot</groupId>
			<artifactId>spring-boot-starter-security</artifactId>
		</dependency>
		<dependency>
			<groupId>org.thymeleaf.extras</groupId>
			<artifactId>thymeleaf-extras-springsecurity6</artifactId>
		</dependency>
		<dependency>
			<groupId>org.springframework.security</groupId>
			<artifactId>spring-security-test</artifactId>
			<scope>test</scope>
		</dependency>

		<dependency>
			<groupId>org.springframework.boot</groupId>
			<artifactId>spring-boot-starter-test</artifactId>
			<scope>test</scope>
		</dependency>
	</dependencies>

</project>
以下安全配置確保只有經過身份驗證的使用者才能看到秘密問候語
Java
package com.example.securingweb;

import org.springframework.context.annotation.Bean;
import org.springframework.context.annotation.Configuration;
import org.springframework.security.config.annotation.web.builders.HttpSecurity;
import org.springframework.security.config.annotation.web.configuration.EnableWebSecurity;
import org.springframework.security.core.userdetails.User;
import org.springframework.security.core.userdetails.UserDetails;
import org.springframework.security.core.userdetails.UserDetailsService;
import org.springframework.security.crypto.bcrypt.BCryptPasswordEncoder;
import org.springframework.security.crypto.password.PasswordEncoder;
import org.springframework.security.provisioning.InMemoryUserDetailsManager;
import org.springframework.security.web.SecurityFilterChain;

@Configuration
@EnableWebSecurity
public class WebSecurityConfig {

	@Bean
	public SecurityFilterChain securityFilterChain(HttpSecurity http) throws Exception {
		http
			.authorizeHttpRequests((requests) -> requests
				.requestMatchers("/", "/home").permitAll()
				.anyRequest().authenticated()
			)
			.formLogin((form) -> form
				.loginPage("/login")
				.permitAll()
			)
			.logout((logout) -> logout.permitAll());

		return http.build();
	}

	@Bean
	public PasswordEncoder passwordEncoder() {
		return new BCryptPasswordEncoder();
	}

	@Bean
	public UserDetailsService userDetailsService() {
		BCryptPasswordEncoder encoder = new BCryptPasswordEncoder();
		UserDetails user =
			 User.builder()
				.username("user")
				.password(encoder.encode("password"))
				.roles("USER")
				.build();

		return new InMemoryUserDetailsManager(user);
	}
}
Kotlin
package com.example.securingweb

import org.springframework.context.annotation.Bean
import org.springframework.context.annotation.Configuration
import org.springframework.security.config.annotation.web.builders.HttpSecurity
import org.springframework.security.config.annotation.web.configuration.EnableWebSecurity
import org.springframework.security.config.annotation.web.invoke
import org.springframework.security.core.userdetails.User
import org.springframework.security.core.userdetails.UserDetailsService
import org.springframework.security.crypto.bcrypt.BCryptPasswordEncoder
import org.springframework.security.crypto.password.PasswordEncoder
import org.springframework.security.provisioning.InMemoryUserDetailsManager
import org.springframework.security.web.SecurityFilterChain

@Configuration
@EnableWebSecurity
class WebSecurityConfig {

    @Bean
    fun securityFilterChain(http: HttpSecurity): SecurityFilterChain {
        http {
            // Kotlin security extensions allow concise DSL instead of builder-style lambdas
            authorizeHttpRequests {
                authorize("/", permitAll)
                authorize("/home", permitAll)
                authorize(anyRequest, authenticated)
            }
            formLogin {
                loginPage = "/login"
                permitAll()
            }
            logout {
                permitAll()
            }
        }

        return http.build()
    }

    @Bean
    fun passwordEncoder(): PasswordEncoder {
        return BCryptPasswordEncoder()
    }

    @Bean
    fun userDetailsService(): UserDetailsService {
        val encoder = BCryptPasswordEncoder()
        val user = User.builder()
            .username("user")
            .password(encoder.encode("password"))
            .roles("USER")
            .build()

        return InMemoryUserDetailsManager(user)
    }
}
WebSecurityConfig 類使用 @EnableWebSecurity 進行註解,以啟用 Spring Security 的 Web 安全支援並提供 Spring MVC 整合。它還公開了兩個 bean 來設定 Web 安全配置的一些細節
SecurityFilterChain bean 定義了哪些 URL 路徑應該受到保護,哪些不應該受到保護。具體來說,/ 和 /home 路徑配置為不需要任何身份驗證。所有其他路徑必須經過身份驗證。
當用戶成功登入時,他們將被重定向到先前請求的需要身份驗證的頁面。有一個自定義的 /login 頁面(由 loginPage() 指定),並且每個人都被允許檢視它。
UserDetailsService bean 設定了一個記憶體使用者儲存,其中只有一個使用者。該使用者的使用者名稱為 user,密碼為 password,角色為 USER。
現在您需要建立登入頁面。login 檢視已經有一個檢視控制器,因此您只需要建立登入檢視本身,如以下列表(來自 src/main/resources/templates/login.html)所示
<!DOCTYPE html>
<html xmlns="http://www.w3.org/1999/xhtml" xmlns:th="https://www.thymeleaf.org">
    <head>
        <title>Spring Security Example </title>
    </head>
    <body>
        <div th:if="${param.error}">
            Invalid username and password.
        </div>
        <div th:if="${param.logout}">
            You have been logged out.
        </div>
        <form th:action="@{/login}" method="post">
            <div><label> User Name : <input type="text" name="username"/> </label></div>
            <div><label> Password: <input type="password" name="password"/> </label></div>
            <div><input type="submit" value="Sign In"/></div>
        </form>
    </body>
</html>
此 Thymeleaf 模板提供了一個表單,用於捕獲使用者名稱和密碼並將其釋出到 /login。根據配置,Spring Security 提供了一個過濾器來攔截該請求並對使用者進行身份驗證。如果使用者身份驗證失敗,頁面將重定向到 /login?error,您的頁面將顯示相應的錯誤訊息。成功登出後,您的應用程式將傳送到 /login?logout,您的頁面將顯示相應的成功訊息。
最後,您需要為訪問者提供一種顯示當前使用者名稱和登出的方法。為此,請更新 hello.html 以向當前使用者問好幷包含一個 Sign Out 表單,如以下列表(來自 src/main/resources/templates/hello.html)所示
<!DOCTYPE html>
<html xmlns="http://www.w3.org/1999/xhtml" xmlns:th="https://www.thymeleaf.org"
      xmlns:sec="https://www.thymeleaf.org/thymeleaf-extras-springsecurity6">
    <head>
        <title>Hello World!</title>
    </head>
    <body>
        <h1 th:inline="text">Hello <span th:remove="tag" sec:authentication="name">thymeleaf</span>!</h1>
        <form th:action="@{/logout}" method="post">
            <input type="submit" value="Sign Out"/>
        </form>
    </body>
</html>
我們透過使用 Thymeleaf 與 Spring Security 的整合來顯示使用者名稱。“登出”表單向 /logout 提交 POST 請求。成功登出後,它會將使用者重定向到 /login?logout。
執行應用程式
Spring Initializr 為您建立了一個應用程式類。在這種情況下,您無需修改該類。以下列表顯示了應用程式類
Java
package com.example.securingweb;

import org.springframework.boot.SpringApplication;
import org.springframework.boot.autoconfigure.SpringBootApplication;

@SpringBootApplication
public class SecuringWebApplication {

	public static void main(String[] args) throws Throwable {
		SpringApplication.run(SecuringWebApplication.class, args);
	}

}
Kotlin
package com.example.securingweb

import org.springframework.boot.autoconfigure.SpringBootApplication
import org.springframework.boot.runApplication

@SpringBootApplication
class SecuringWebApplication

fun main(args: Array<String>) {
    runApplication<SecuringWebApplication>(*args)
}
構建可執行 JAR
您可以使用 Gradle 或 Maven 從命令列執行應用程式。您還可以構建一個包含所有必要依賴項、類和資源並執行的單個可執行 JAR 檔案。構建可執行 JAR 使在整個開發生命週期中,跨不同環境等,輕鬆交付、版本化和部署服務作為應用程式。
如果您使用 Gradle,您可以透過使用 ./gradlew bootRun 執行應用程式。或者,您可以透過使用 ./gradlew build 構建 JAR 檔案,然後按如下方式執行 JAR 檔案
如果您使用 Maven,您可以透過使用 ./mvnw spring-boot:run 執行應用程式。或者,您可以使用 ./mvnw clean package 構建 JAR 檔案,然後按如下方式執行 JAR 檔案
| 這裡描述的步驟建立了一個可執行的 JAR。您還可以構建一個經典的 WAR 檔案。 |
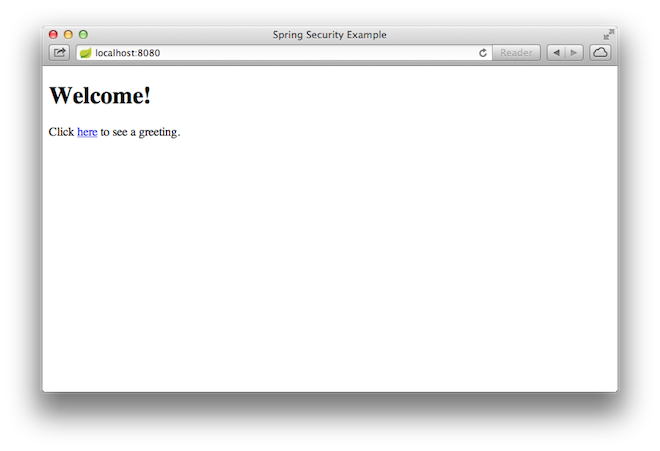
應用程式啟動後,將瀏覽器指向 https://:8080。您應該會看到主頁,如以下圖片所示
當您點選連結時,它會嘗試將您帶到 /hello 的歡迎頁面。但是,由於該頁面受到保護且您尚未登入,它會將您帶到登入頁面,如以下圖片所示
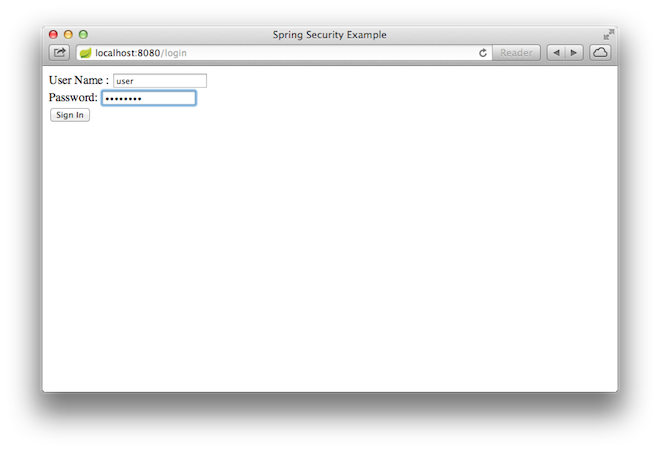
| 如果您帶著非安全版本跳到這裡,您將看不到登入頁面。您應該返回並編寫其餘基於安全的程式碼。 |
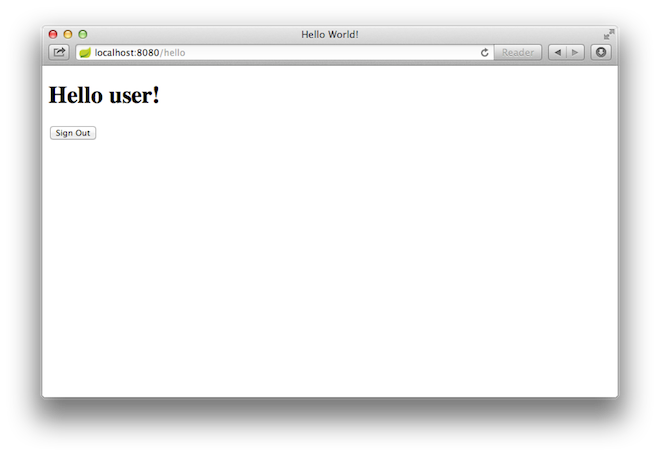
在登入頁面,分別在使用者名稱和密碼欄位中輸入 user 和 password 作為測試使用者登入。提交登入表單後,您將被認證並帶到歡迎頁面,如以下圖片所示
如果您點選登出按鈕,您的身份驗證將被撤銷,並且您將返回到登入頁面,並顯示一條訊息,指示您已登出。
總結
恭喜!您已開發了一個受 Spring Security 保護的簡單 Web 應用程式。